Saturday, October 31, 2015

My Besties Steampunk Layout and New Meet At the Scrappers Corner Challenge

Hi there. I'm so glad you popped in today. 
There's a new challenge going on over at My Bestie Meet at the Scrappers Corner. 

I made a Steampunk layout for the start of the new challenge. 


These bears are just too cute! 


I colored them with Prima watercolor pencils. 
I found the hot air balloon on Pinterest. 

I use Tim Holtz gears and gears from Miriam's Crafting Supplies. The water faucet is a Junk Yard Findings embellishment. They have some really fun embellishments. 


The next little cutie is Hugable Bestie Bears Printable Sheet 10.


The lace is from Gone Artsy and the flat back pearls are from Glitz N Glam Girly Boutique.

I hope you will come by and enter your Bestie projects in our challenge.

See you again soon. Have a great day! 


Christmas Tag/Gift Card Holder

Hi crafty friends! Today is a great day. It's SVG Saturday, Halloween, and I have the honor of being a guest designer at My Sheri CRAFTS. I am so excited! 
The theme for the new challenge at My Sheri CRAFTS is anything with a tag. 
Here is the tag that I made. 


I used two SVGs from My Besties Shop. 


Did you notice the gorgeous Christmas papers?!? 
These are from the Classic Christmas Traditions pack designed by Shellie Geigle. 
I love these papers. The quality is AMAZING. They are so smooth and thick. When I cut them with my Cricut there is no tearing or bunching. 
You can find these papers at J & S Hobbies and Crafts along with 2 other paper packs Shellie designed.


The image on the back is also from the Christmas paper pack. I used foam tape to raise the image up so a gift card would fit nicely behind it. 


I altered the Bear Mittens  a bit by cutting the ears off of them. 
They are made out of mulberry paper. 


I used flat backed pearls from Glitz N Glam Girly Boutique. I love these flat back pearls. There's so many different ways to use them. 

Thank you for dropping in today. Hope you all have a safe and happy Halloween. 

Friday, October 30, 2015

Strong Woman

Today I am sharing my last Breast Cancer awareness card for the month. 
It may be the end of Breast Cancer awareness month, but we should all be aware of this awful disease year round. Please, please, PLEASE do your monthly self exams. If you don't know how to do them properly, you can ask your doctor or research self breast exams online. HERE is a site I found that has lots of information. 


For my card I used an Ady Almanza Doll Dreams  image. She is called Strong Woman. 
I love this image. Not only is she gorgeous, she is strong and represents a fighter. 

If you like this image you can purchase her and more of Ady's images in her Etsy shop.

Thank you for stopping by today. Have a safe and happy Friday! 


Thursday, October 29, 2015

My Bestie New Release Oct 29, 2015

I have the privilege of being part of another My Besties new release party. 
When I saw this image I thought she would be perfect on a Halloween card. 


You can find this image and many more Besties in the My Besties Shop. 


I embellished the card with bats (Bats and Moon SVG from the My Besties Shop), cheese cloth, a bow and a plastic spider. 

The papers I used are My Mind's Eye Something Wicked and Authentique "Tangled"

Halloween cards are so much fun! 

Thank you for stopping by. Hope you have a great day =)


Sunday, October 25, 2015

Breast Cancer Mixed Media Project with My Besties

Hello crafty friends! 
I am back again with another Breast Cancer Awareness project on the
This time I played with mixed media.
I took the Mixed Media Class at Kit and Clowder. It is an awesome class!
 I love this style of art and am having so much fun learning new techniques. 


I used the Ribbon of Hope  image which can be found in Sherri Ann Baldy's Etsy Shop and in the My Bestie Shop. She is colored with Copic markers and then fussy cut. Instead of cutting around every curl I just cut along the outside of her hair and then used a small paint brush to paint Dylusions bubblegum and crushed grape ink sprays (purchased at Miriam's Crafting Supplies) on the white spots. 


My canvas for this project was a side off of a Cheez-it cracker box. 
I love the thought of turning trash into a treasure. 


I started out by painting the cardboard with Gesso. I put 2 coats, letting each one dry before I continued.  My next step was to make homemade texture paste. You can find lots of different recipes online and the best part, you more than likely already have the items to make it in your cupboards. The recipe I used is from Such a Pretty Mess. 

So, now  that you have your "canvas" prepared and the texture paste made, you are going to choose a stencil (or several) to create texture on your canvas. I chose to use one stencil for my project. Place your stencil on the canvas and begin spreading texture past over the stencil where ever you want the texture to be then pull the stencil off. Let it sit and dry or use your heat tool to dry it if you are impatient like me. 


Once the texture paste was dry I used Tattered Angels Gold Glimmer Mist and Dylusions bubblegum and crushed grape ink sprays to color my canvas and let it dry again. When that was dry I took a paint brush and rubbed gold paint over the raised parts of the canvas. I decided to put a little Tim Holtz tissue paper on a couple of the corners. I tore a couple chunks off of the roll and adhered them with gel medium. 
More drying time required...


I outlined the butterfly on the tissue paper with Journey Glaze and then sprinkled pink glitter glass over the glaze and let it dry. The next step was to apply more Journey Glaze to the center of the butterfly, add a small piece of white floral wire for the antennas and then sprinkle black glitter glass on the butterflies body AND dry again. Then I used a piece of bubble wrap to stamp gold paint random spots on the canvas. Once the paint was dry I added the sentiment and image. 


I found the sentiment on Pinterest. It's perfect for someone fighting cancer or going through any trial for that matter. 

Any time I am doing a project I place the image and embellishments on and get them exactly where I want them before adhering them. Sometimes, I even take a picture with my iPhone so I don't forget how I had them placed. 

I dipped cheese cloth in gold paint, let it dry and placed it around the image and sentiment. 
Other embellishments I have used are from Renea Bouquets, Glitz N Glam Boutique 


One thing I have learned about crafting, in the last couple of years is that the back of your project needs to be finished too. 
I finished the back of my canvas with some awesome Breast Cancer Awareness paper that I got from Joann's. 


Are you looking for a way to do service?  Chemo Angels is an incredible program that allows you to do "service" for someone that is fighting cancer.  You fill out an application and they pair you with someone that has similar interests as you. Then you send cards and small gifts to lift the spirits of your Chemo Buddy who is currently going through chemo. There are different types of Angels. Chemo Angels, Card Angels, and Prayer Angels.  They even have Senior Angels. I currently have one Chemo Buddy through Chemo Angels. If you know anyone who is or will be going through chemo, please share Chemo Angels with them. See if they would like to sign up to be a Chemo Buddy. There is an application on the Chemo Angels site. 

Thank you so much for stopping by Toadally love to craft today. Have an amazing day! 

Challenges Entered

Saturday, October 24, 2015

SVG Saturday with J & S Hobbies paper

Hello! I'm back for SVG Saturday. 
The first project I made is a special gift for my little one. They always seem to ask how Santa gets in the house when there is no chimney. Now, I have an answer thanks to Jookniper, a gal in one of the Cricut Facebook groups I'm in. 


This was so simple to make. I used the Postage Stamp Card SVG from the My Besties Shop for the base. I had my Cricut Explore do the writing for me, added a key, a couple stamps to make it look like it'd been mailed, a candle stick (fussy cut from the papers I used) and some embossing powder around the edges. 


My second card is made using the 7 Layer Scallop SVG and Leaf Cluster SVG from the My Besties Shop. I love how you can use the same SVG a million times and have each project come out looking very different. 


I used my fabulous new Prima Brick Stamp that I purchased from Renea Bouquets. I used Rangers Embossing Dabber and Vintage Gold embossing powder on the stamp to give the card texture. 
I used a few different laces for this card. The pearl lace is from Art Attack Supplies, the burlap lace is from Micheal's and the white lace on the bottom is from Gone Artsy.


I LOVE how this card turned out! 


Both of my projects today have been made with the GORGEOUS Classic Christmas Traditions. The paper is thick and very smooth. It cuts like butter in my Cricut explore. They are designed by Shellie Geigle. You can find the papers I used today and more at J&S Hobbies and Crafts. 

Thank you for visiting me today! I hope you all have a fabulous weekend. 


Monday, October 19, 2015

Time To Shake Things Up With The Cutting Cafe!


Hi there! We're playing with shakers over at The Cutting Cafe this week. 
These shaker cards are LOADS of fun! 

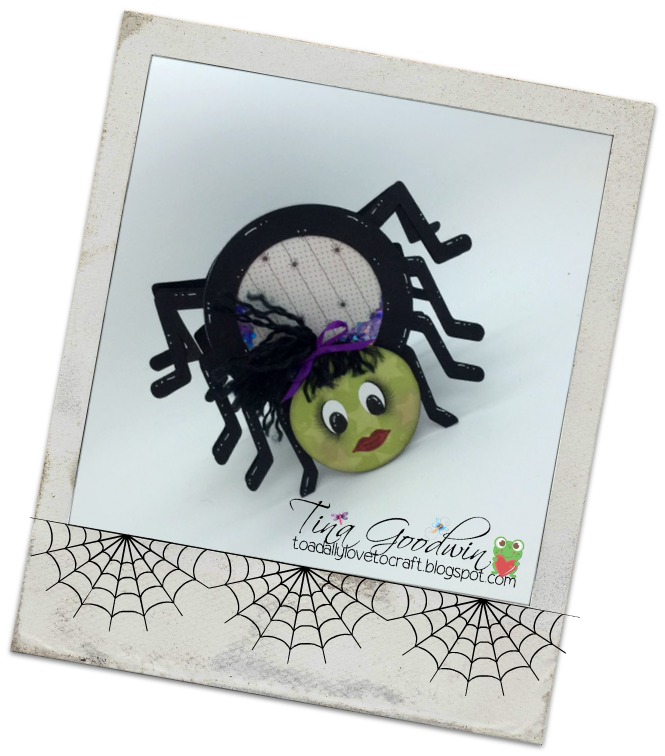
I used the spider shaker from the 3 Halloween Shaker Set for my projects today. The set also comes with a witches hat and candy corn. All super cute files.  


I used sequins for the shaky parts in the spider. 
Her hair is made out of yarn. 

The second card I made is from the same set. 
I chose not to make this one a shaker. 


 I used red flat back pearls from Glitz N Glam Girly Boutique for the spiders eyes. 


I had a lot of fun with these cards. 
To be honest, these are the only kind of spiders that don't make my skin crawl! 

The Cutting Cafe has shakers for all occasions. They are so fun and easy to make. So easy my 8 year old loves making them. You can check her candy shaker card on her blog Kanga's Krafts.

I hope you will stop by The Cutting Cafe on the 21st to see what the rest of the design team has come up with. If you leave a comment on the inspirational post you will be entered in a chance to win 3 free Cutting Cafe files of your choice. 

Bye, bye for now!