Saturday, December 27, 2014

Cheetah Print .22


Hello! I hope you all had a very Merry Christmas! 
I always love the Holidays. I am also always very thankful when they are done so life can get back to normal...if there really is such a thing. 
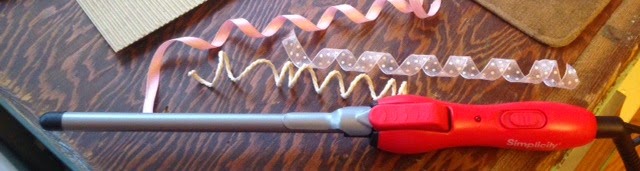
My daughter Kylah got a .22 for Christmas this year. My husband bought the pink one for her, but we decided to give it a make over. Here's a before picture


I personally LOVE pink, but Kylah's favorite color is green. I wanted to put some kind of design on it for her.(I got the idea of painting the stock from Tam Tam...a lady in The Cricut Design Space Facebook Page) So I sat down and went to Pinterest. I did a search for painted gun stocks. Kylah eventually sat down next to me and was looking at them with me (not knowing what I was really looking for) We came across a purple cheetah print one that she fell instantly in love with. Later I showed my husband and said "I can totally do this!" I was so excited! 

Andrew (my husband) took the gun apart for me and I got right to work.


I found the cheetah print cut file on the Cricut Image Set Boho Graphics Iron on. I cut it out on Oracal 651 vinyl and placed the center of each spot on the stock. (some of the spots are not a complete circle so I used an x-acto knife to complete the circle. I hope that makes sense.) 


The monogram came from Miss Kate Cuttables in a set with the entire alphabet in caps.

Once I had all the vinyl on, I hung the stock in the garage and spray painted it green. It took several layers of paint.


Once it was dray I carefully peeled the vinyl off which left pink spots everywhere. (I'm sorry, I forgot to take a picture of this step) Some of the paint did come up with the spots, but that didn't matter to me because I was out lining each spot with black. 


I outlined the monogram and each pink spot with black paint by hand. I used the finest paint brush I had to do the monogram. An even finer paint brush would have been better (which I got for Christmas)


Once it was all dry I put a protective coating on, let it dry and then Andrew put it all back together. I love how I get to do the fun stuff and he does the necessary work stuff. I'm kinda spoiled =)


Kylah loves her new gun! 

Thank you for stopping by Toadally Love To Craft! I hope you have been inspired.


Saturday, December 20, 2014

The Cutting Cafe Gift Bows

Oh my gosh!!! Only 4 more days until Christmas! Are you ready?!?!?
No?! Still have wrapping to do and you've run out of bows!?!  Well, The Cutting Cafe is here to help! Regina has created a file so you can make bows yourself. 
This was the first time I had ever made my own bows...and let me tell you it is SUPER easy and tons of fun. I loved being able to choose different papers for each bow that I created. 


I used my Cricut Explore to make these bows, but you can also cut them out by hand. 


The Cutting cafe even has a gift bag file! This file is perfect for ANY occasion. The gift bow file and the Christmas tree shaker card were the perfect files to make my bag Christmasy. I decided to play with this file a little in Cricut Design Space and shrink the file to make a small bow.
It worked perfectly! After cutting the strips I embossed it with a polka dot folder
and then added glitter glue to the dots. 


I used the bows I made for this assignment to decorate the gifts my Girl Scout troop bought for a girl they adopted for Christmas through a local organization. The Girls saved $200.00 out of the money they raised selling cookies to adopt a child and buy gifts for other teens in the program.
Here's a picture of the girls with all the gifts they bought. 


Along with the purchased gifts are a couple I made a couple gifts I made for Rose (the girl we adopted). A canvas...


and a decorated clipboard. (Rose's favorite color is black)


On Saturday Dec. 13 the troop delivered their gifts to the Special Santa's Workshop
and volunteered for two hours filling "wishlists".  I am SUPER proud of them for all their hard work!

Make sure you stop by The Cutting Cafe and leave a comment on the design team inspirational post on the 7th and 21st of every month so you can be entered in a chance to win 3 free files of your choice. 

Thank you for stopping by Toadally Love To Craft! Have a Merry Christmas! 


Saturday, December 6, 2014

Shake It baby, Shake It!


Shaker cards are my new favorite thing! Regina over at The Cutting Cafe has created the cutest shaker cards EVER!! I have three of them to share with you for our DT inspirational post today. 

The first card I made is the Snowman Shaker 


The snowman is the cutest! This file comes with accessories to decorate your snowman to your liking.  I decided to use a piece of scrap denim fabric for his hat and scarf, his nose is a carrot button that I had in my stash, and the snow flake that I used is from the Cricut Image set Winter Lace. I filled my shaker with Microbeads. (I didn't even know there was such a thing until recently) I embossed the snowman's tummy with a snowflake folder from Darice and then lightly inked the raised flakes. The snow on the ground and the shovel is dimensional paint that I got at Micheal's. I really like the added dimension the snow gives my card. 


The 2nd card I made is the Snow Globe Shaker.


I love this file because you can use so many different pictures for your background. You could even use a family photo! The super cute image I used is a digi stamp from ppinkydollsart. It was given out in a fabulous Facebook group I am a part of  called Chic Craftique. I am still learning to color with Copic and Spectrum Noir Markers. I must say I have a LONG way to go! Lol. The snowflake on this card is from the Cricut Image Set Snowflake Flourish. The shaky part of this card is large glitter from Martha Stewart. You can find it at Micheal's. The sentiment comes with The Cutting Cafe's Christmas Word Shaped Shakers


And the 3rd card (my favorite) is the Mitten Shaker


I found a super tiny snowflake punch at Target which was prefect with the micro-beads for the shaky, shaky insides. 


I got to use a super fun new tool for this card!
A ribbon curler! I didn't know these existed either!! Can you tell I'm learning a ton? I'm sure my husband would like me to stop learning so much so I stop buying so much. Lol! 


I am hooked on these shakers! 
You can find the files I used here. You can buy the set of 8 or you can buy each file individually. 
Make sure you stop by the The Cutting Cafe and check out the awesome projects from the rest of the design team on the 7th. If you leave a comment you will be entered to win three free sets of your choice.

Thank you so much for stopping by my blog and the love you leave in your comments. I enjoy reading every one of them. 

Happy crafting!